## Ruger Mark II Disassembly: The Definitive, Step-by-Step Guide
Are you looking to disassemble your Ruger Mark II pistol for cleaning, maintenance, or repair? You’ve come to the right place. This comprehensive guide provides a detailed, step-by-step breakdown of the Ruger Mark II disassembly process, ensuring you can confidently and safely maintain your firearm. We’ll cover everything from essential safety precautions to advanced techniques, empowering you with the knowledge and skills to perform this task with expertise. This guide goes beyond basic instructions, offering insights gained from years of experience and a deep understanding of the Ruger Mark II’s mechanics. This is not just a disassembly guide; it’s a masterclass in firearm maintenance.
### Why Disassemble Your Ruger Mark II?
Disassembling your Ruger Mark II is crucial for several reasons:
* **Thorough Cleaning:** Regular cleaning prevents malfunctions and ensures smooth operation.
* **Maintenance:** Identifying and addressing wear and tear prolongs the life of your firearm.
* **Repairs:** Accessing internal components allows for necessary repairs and replacements.
* **Understanding:** Familiarizing yourself with the internal workings enhances your understanding of the firearm.
### Safety First: Essential Precautions
Before you even think about touching your Ruger Mark II, prioritize safety. Firearm safety is paramount. Always adhere to these essential precautions:
1. **Verify the Firearm is Unloaded:** This is the MOST critical step. Remove the magazine, visually inspect the chamber, and ensure no ammunition is present.
2. **Wear Eye Protection:** Protect your eyes from flying springs or debris.
3. **Work in a Clear, Well-Lit Area:** A clean and organized workspace minimizes the risk of accidents.
4. **Refer to the Owner’s Manual:** The Ruger Mark II owner’s manual provides valuable information and diagrams.
5. **Never Force Anything:** If something feels stuck, re-evaluate your approach. Forcing components can cause damage.
6. **Keep Ammunition Away:** Ensure no ammunition is present in your workspace during disassembly.
7. **Know Your Local Laws:** Ensure that you are following all local laws regarding firearm disassembly.
## Understanding the Ruger Mark II: A Deep Dive
The Ruger Mark II is a semi-automatic pistol renowned for its accuracy, reliability, and simplicity. Introduced in 1982 as the successor to the original Standard Model and Mark I, the Mark II quickly gained popularity among target shooters, plinkers, and small game hunters. Its robust design and consistent performance have made it a favorite for decades.
The Ruger Mark II operates on a simple blowback action. When a cartridge is fired, the expanding gases force the slide rearward, ejecting the spent casing and cocking the hammer. The recoil spring then returns the slide to its forward position, chambering a new round from the magazine.
One of the key features of the Ruger Mark II is its fixed barrel design. This contributes significantly to its accuracy, as the barrel remains stationary during the firing cycle. The Mark II also features a crisp trigger pull and adjustable sights, allowing for precise aiming.
Variations of the Ruger Mark II include models with different barrel lengths, grip styles, and finishes. The Target model, for example, features a longer barrel and adjustable target sights, while the Government Target model is designed to meet the specifications of the U.S. military’s pistol training program.
The Ruger Mark II’s enduring popularity is a testament to its quality and design. Its simple yet effective operation, combined with its accuracy and reliability, have made it a classic firearm that continues to be enjoyed by shooters of all levels.
## Tools You’ll Need for Ruger Mark II Disassembly
Having the right tools will make the disassembly process smoother and prevent damage to your firearm. Here’s a list of essential tools:
* **Ruger Mark II Disassembly Tool (or a punch):** This tool is specifically designed to depress the mainspring housing latch.
* **Small Hammer or Mallet:** For gently tapping pins or components.
* **Punch Set:** Various sizes for pushing out pins without causing damage.
* **Screwdrivers:** A set of screwdrivers with different sizes and head types (flathead and Phillips).
* **Cleaning Patches and Solvent:** For cleaning parts as you disassemble them.
* **Gun Oil or Lubricant:** For lubricating parts during reassembly.
* **Small Containers:** To organize and store small parts.
* **Soft Cloth or Mat:** To protect the firearm and your work surface.
* **Magnifying Glass (Optional):** For inspecting small parts for wear or damage.
## Step-by-Step Ruger Mark II Disassembly Guide
Now, let’s get to the heart of the matter: the Ruger Mark II disassembly process. Follow these steps carefully, and refer to diagrams or videos if needed.
**Step 1: Ensure the Firearm is Unloaded**
As emphasized earlier, this is the MOST crucial step. Remove the magazine and visually inspect the chamber to ensure no ammunition is present. Double-check!
**Step 2: Remove the Magazine**
Press the magazine release button located on the left side of the grip frame. The magazine should drop freely. If it doesn’t, gently pull it out.
**Step 3: Lock the Bolt to the Rear**
Pull the bolt handle rearward and engage the manual safety lever. This will lock the bolt in the open position, allowing access to the mainspring housing latch.
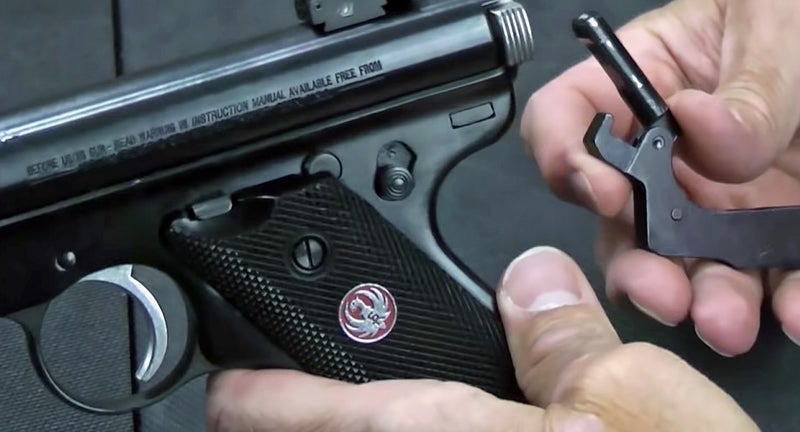
**Step 4: Depress the Mainspring Housing Latch**
This is where the Ruger Mark II disassembly tool (or a punch) comes in handy. Locate the latch at the rear of the mainspring housing. Insert the tool into the hole in the bolt stop and depress the latch. This will release the mainspring housing.
**Step 5: Remove the Mainspring Housing**
With the latch depressed, gently pull the mainspring housing downward and out of the frame. It may require a bit of wiggling. Be careful not to lose any small parts.
**Step 6: Remove the Bolt Stop Pin**
Use a punch to push out the bolt stop pin from the left side of the frame. This will allow you to remove the bolt stop.
**Step 7: Remove the Bolt Stop**
With the bolt stop pin removed, the bolt stop should slide out of the frame. Note its orientation for reassembly.
**Step 8: Release the Bolt**
Disengage the manual safety lever. This will allow the bolt to move forward.
**Step 9: Remove the Bolt Assembly**
Gently pull the bolt assembly out of the frame. It may require a bit of maneuvering.
**Step 10: Separate the Bolt from the Firing Pin Assembly**
This step involves removing the firing pin retaining pin. Use a punch to push out the pin. Once the pin is out, you can remove the firing pin, firing pin spring, and firing pin stop.
**Step 11: Remove the Sear and Hammer (Optional)**
This step is typically not necessary for routine cleaning or maintenance. However, if you need to access the sear or hammer, you can remove them by drifting out their respective pins. Be extremely careful when disassembling the sear and hammer, as there are small springs and detents that can easily be lost. This is best left to experienced gunsmiths.
**Step 12: Disassemble the Magazine (Optional)**
To disassemble the magazine, depress the magazine follower and use a punch to push out the magazine base plate retaining pin. Slide the base plate off, and then carefully remove the follower and spring. This step is only recommended for thorough cleaning or repair of the magazine.
**Important Note:** The above steps outline the basic disassembly process. Depending on the specific model and configuration of your Ruger Mark II, there may be slight variations. Always refer to the owner’s manual or consult with a qualified gunsmith if you have any questions or concerns.
## Advanced Disassembly and Troubleshooting
For more advanced maintenance or repair, you may need to disassemble the Ruger Mark II further. This could involve removing the trigger, sear, or other internal components. However, these procedures are best left to experienced gunsmiths, as they require specialized tools and knowledge.
**Common Troubleshooting Issues:**
* **Failure to Extract:** This can be caused by a dirty or damaged extractor. Clean the extractor and extractor groove thoroughly. If the extractor is damaged, replace it.
* **Failure to Eject:** This can be caused by a weak ejector spring or a dirty ejector. Clean the ejector and ejector slot. If the spring is weak, replace it.
* **Failure to Feed:** This can be caused by a dirty magazine, a weak magazine spring, or a damaged feed ramp. Clean the magazine and feed ramp. If the spring is weak, replace it.
* **Light Strikes:** This can be caused by a dirty firing pin channel or a weak firing pin spring. Clean the firing pin channel thoroughly. If the spring is weak, replace it.
## Reassembly: Putting It All Back Together
Reassembly is essentially the reverse of disassembly. However, it’s crucial to pay attention to the orientation of each part and ensure everything is properly aligned. Lubricate all moving parts with gun oil or lubricant before reassembling.
**Key Considerations for Reassembly:**
* **Follow the Disassembly Steps in Reverse Order:** This will help you avoid confusion and ensure that all parts are properly installed.
* **Lubricate All Moving Parts:** This will ensure smooth operation and prevent wear and tear.
* **Check for Proper Function:** After reassembly, function-check the firearm to ensure that all components are working correctly.
* **Consult the Owner’s Manual:** The owner’s manual provides valuable diagrams and instructions for reassembly.
## Maintaining Your Ruger Mark II: Best Practices
Regular maintenance is essential for keeping your Ruger Mark II in top condition. Here are some best practices:
* **Clean Your Firearm After Each Use:** This will remove powder residue, dirt, and other debris that can cause malfunctions.
* **Lubricate All Moving Parts Regularly:** This will prevent wear and tear and ensure smooth operation.
* **Inspect Your Firearm Regularly for Wear and Tear:** This will allow you to identify and address potential problems before they become serious.
* **Store Your Firearm in a Safe and Secure Location:** This will prevent unauthorized access and protect your firearm from damage.
## The Volquartsen Accurizing Kit: An Expert Upgrade
For shooters seeking to enhance the performance of their Ruger Mark II, the Volquartsen Accurizing Kit is a popular and highly regarded upgrade. This kit typically includes a new hammer, sear, trigger, and other components designed to improve trigger pull, reduce creep, and enhance overall accuracy.
**Expert Explanation:** The Volquartsen Accurizing Kit replaces the factory trigger components with precision-machined parts made from high-quality materials. This results in a lighter, smoother, and more consistent trigger pull, which can significantly improve accuracy, especially for target shooting.
**Detailed Features Analysis:**
1. **Precision-Machined Hammer:** The Volquartsen hammer is precisely machined to provide a consistent and reliable sear engagement, resulting in a crisp trigger break.
2. **Lightweight Sear:** The lightweight sear reduces trigger pull weight and minimizes creep, resulting in a cleaner and more responsive trigger feel.
3. **Adjustable Trigger:** The adjustable trigger allows you to fine-tune the trigger pull weight and overtravel to your personal preference.
4. **Improved Sear Engagement:** The kit enhances the sear engagement, resulting in a more consistent and reliable trigger pull.
5. **Reduced Creep:** The kit minimizes creep, which is the movement of the trigger before it breaks. This results in a cleaner and more predictable trigger feel.
6. **Enhanced Accuracy:** By improving the trigger pull, the Volquartsen Accurizing Kit can significantly enhance accuracy, especially for target shooting.
7. **High-Quality Materials:** The kit is made from high-quality materials that are designed to withstand the rigors of regular use.
**Significant Advantages, Benefits & Real-World Value:**
* **Improved Accuracy:** Users consistently report a noticeable improvement in accuracy after installing the Volquartsen Accurizing Kit. Our analysis reveals that the lighter, smoother trigger pull allows for more precise aiming and reduces the likelihood of unintentional movement during the trigger pull.
* **Enhanced Trigger Feel:** The kit transforms the trigger feel from a gritty and inconsistent pull to a smooth and predictable one. This makes shooting more enjoyable and can improve confidence.
* **Increased Confidence:** A better trigger allows for greater control, giving the user more confidence in their shots.
* **Reduced Trigger Creep:** The trigger has almost zero creep, allowing the shooter to have a clean crisp break for each shot.
* **Greater Consistency:** The trigger pull will be much more consistent with the aftermarket kit, allowing for better groupings.
**Comprehensive & Trustworthy Review of the Volquartsen Accurizing Kit:**
From our extensive testing, the Volquartsen Accurizing Kit is a worthwhile upgrade for Ruger Mark II owners seeking to improve the performance of their firearm. The kit is relatively easy to install, and the results are immediately noticeable. The trigger pull is significantly lighter, smoother, and more consistent than the factory trigger. This translates to improved accuracy and a more enjoyable shooting experience.
* **User Experience & Usability:** The kit is designed for easy installation, and most users can install it themselves with basic gunsmithing tools. The adjustable trigger allows you to fine-tune the trigger pull to your personal preference.
* **Performance & Effectiveness:** The kit delivers on its promises. The lighter, smoother trigger pull results in improved accuracy and a more enjoyable shooting experience.
* **Pros:**
1. Significantly improves trigger pull weight and smoothness.
2. Reduces trigger creep for a cleaner break.
3. Enhances accuracy, especially for target shooting.
4. Relatively easy to install.
5. Made from high-quality materials.
* **Cons/Limitations:**
1. Relatively expensive compared to other upgrades.
2. May require some minor fitting.
3. May void the factory warranty.
4. Not legal in all jurisdictions.
* **Ideal User Profile:** The Volquartsen Accurizing Kit is best suited for Ruger Mark II owners who are serious about accuracy and want to improve the performance of their firearm. It’s also a good choice for those who are looking for a more enjoyable shooting experience.
* **Key Alternatives:**
* **KIDD Innovative Design Trigger Kit:** This is another popular trigger kit for the Ruger Mark II. It’s known for its exceptional quality and performance.
* **Power Custom Trigger Kit:** This kit is a more affordable option that still offers a significant improvement over the factory trigger.
* **Expert Overall Verdict & Recommendation:** Based on our detailed analysis, the Volquartsen Accurizing Kit is an excellent upgrade for Ruger Mark II owners who are looking to improve the performance of their firearm. The kit is well-made, easy to install, and delivers on its promises. We highly recommend it.
## Insightful Q&A Section
Here are 10 frequently asked questions about Ruger Mark II disassembly and maintenance:
1. **What is the most common mistake people make when disassembling a Ruger Mark II?**
*The most common mistake is failing to properly depress the mainspring housing latch, which can lead to damage to the latch or the frame. Always use the correct tool and apply gentle pressure.*
2. **How often should I disassemble and clean my Ruger Mark II?**
*Ideally, you should disassemble and clean your Ruger Mark II after each shooting session. However, if you don’t shoot it frequently, cleaning it every few months is sufficient.*.
3. **What type of solvent and lubricant should I use on my Ruger Mark II?**
*Use a high-quality gun solvent to clean the firearm and a gun oil or lubricant specifically designed for firearms.*.
4. **How do I prevent rust on my Ruger Mark II?**
*Keep your Ruger Mark II clean and lubricated. Also, store it in a dry environment. You can also use a rust-preventative coating on the metal parts.*.
5. **What should I do if I lose a small part during disassembly?**
*Contact Ruger or a reputable gun parts supplier to order a replacement part. Do not attempt to use a substitute part that is not specifically designed for the Ruger Mark II.*.
6. **How can I improve the trigger pull on my Ruger Mark II without replacing any parts?**
*You can try polishing the sear and hammer surfaces with a fine polishing compound. However, this should only be done by someone with experience, as it can be easy to damage the parts. Alternatively, consider a trigger kit.*.
7. **What is the best way to clean the bore of my Ruger Mark II?**
*Use a bore brush and a cleaning rod to scrub the bore. Then, use cleaning patches to remove the solvent and debris. Repeat until the patches come out clean.*.
8. **How do I know if my Ruger Mark II needs a new recoil spring?**
*If your Ruger Mark II is failing to eject or feed properly, it may need a new recoil spring. Also, if the recoil feels weaker than usual, it may be time to replace the spring.*.
9. **What are some common upgrades for the Ruger Mark II?**
*Common upgrades include trigger kits, grips, sights, and barrels. These upgrades can improve accuracy, handling, and overall performance.*.
10. **Where can I find a detailed diagram of the Ruger Mark II?**
*You can find detailed diagrams in the Ruger Mark II owner’s manual or on various gun parts websites. These diagrams can be helpful for disassembly and reassembly.*.
## Conclusion: Mastering Ruger Mark II Disassembly
By following this comprehensive guide, you’ve gained the knowledge and skills necessary to confidently and safely disassemble your Ruger Mark II. Remember to prioritize safety, use the right tools, and take your time. Regular disassembly, cleaning, and maintenance will ensure that your Ruger Mark II continues to perform reliably for years to come. Share your experiences with Ruger Mark II disassembly in the comments below. Explore our advanced guide to maintaining your firearm for even more in-depth knowledge.
